Saturday, May 28, 2011

Memorial Day weekend in Minneapolis

We are 1-week veterans of the Minneapolis area. Basically, we have no idea where the trails are or where they go. We hopped on a trail behind our complex and headed North. After a few miles, we realized that we were close to downtown, and Target Field was ahead of us.

The 3-year-old behind me, the 5-year-old on the very back. 

The Xtracycle is great for these adventures.

The trail runs right under Target Field and toward the river.

Lisa was enjoying life on the Casseroll. 

We even got to race a train on the way back.
Great start to a great weekend.

Today's reason of WHY I RIDE a bike: The whole family can enjoy the outdoors together.

Saturday, May 21, 2011

Minneapolis for the summer

For the next three months, I'll be blogging about my adventures in Minneapolis. I'm interning with Best Buy in International Finance. I live about 7 miles away from the BBY campus, so the commute should prove lovely.

Of course, I had to bring along the fleet, including the Xtracycle. Here's what the roof of my poor 1999 Forester looked like today:


With a couple ratchet straps, I fit the Xtracycle, the Casseroll, the girls' bikes, and the Brompton. Oh, and two storage bins for good measure.

Today's reason for WHY I RIDE a bike: I can easily explore and navigate my way through bike-friendly new cities (the ability to do so affects where I live and who I want to work for).

Monday, May 16, 2011

MKS GR-9 pedals replacing MKS Sylvan Lite

I changed my pedals today. My original plan with the MKS Sylvan Lite pedals was to use the Dromarti Race with the toe clip cleats. Since I went with the Dromarti Storica, the profile of the Sylvan Lite was suboptimal for the sole of this shoe.

Here's a shot of the Sylvan Lite with toe cage still installed:


Heres the pedal sans toe cage:


This gives you an idea of the profile of the pedal against the shoe. The pedal is designed with the aforementioned cleat in mind, to nestle on the rear lip of the pedal. With a flat-soled shoe, I wanted a more platform-style pedal that is also toe cage friendly.


Introducing, the MKS GR-9. I picked up a pair from Universal Cycles. They have a good inventory, they ship from multiple warehouses (MN and UT, for example), and have an instant "price-match" (or close thereto) feature. 

The GR-9 pedal has a similar shape, with a flat sole friendly design. 


Here's the pedal in complete contact with the sole of the shoe. That's what I was looking for.


I also spent the day replacing my brakes (the actual brakes, not the pads), building a new rear wheel (new hub, spokes, nips), installing a new front rack, and replacing the middle chainring, chain, and cassette. Posts on these projects to come.

Today's reason for Why I Ride a bike: I enjoy making changes as my tastes and needs evolve.

Saturday, May 14, 2011

1999 Subaru Forester Halfshaft Replacement

I can explain:

1-This is still a bike blog.
2-I own a car and drive it on occasion.
3-This is part of Why I Ride a bike. Bike repairs > car repairs. Always.


Our car is old. 160,000 miles old. Over the past few months, the dreaded CV joint click began to develop and progressively worsen. It got so bad that they would click with straight-forward acceleration. Not good. Fortunately, I have accumulated some Subaru know-how over the years (this is my 7th, I think, and one of 5 currently in the family).

I found THIS lovely tutorial on SubaruForester.org on changing the halfshafts. As you would expect, I have a couple modifications. I didn't take as many pictures, only where things differed a bit.

Step One:

Find wheel.


Step Two:

Locate replacement halfshaft. (I recommend NAPA. Their remanufactured axles are affordable and are done by A-1 Cardone.)


Step Three: 

Remove front wheel. This is easier to do if the wheel is elevated off the ground by means of a jack or someone strong. The big nut in the center is the axle nut, 32mm. Now is a good time to remove this nut. Leave the transmission in something other than neutral. I didn't use an impact wrench (just my manpower), which would make the job much easier. Just a thought. Also, my new axles came with new nuts and pins (see below).


Step Four:

Loosen and remove the 2 strut bolts (19mm). The lower bolt is a pivot, and the upper bolt is a cam, used for alignment. If you're good, you can get this in the same position when reattaching everything. Chalk paint or something would help make marks if you don't have old rusty marks like mine does. 


Step Five:

The next step will be to remove the brake caliper. This takes 17mm tools (2 bolts). Have a bungee ready to hang the caliper from a strut coil. In the tutorial referenced above, the caliper was taken apart in two stages. This is not necessary. Just do the 2 17mm bolts and hang it up. I do this after the strut bolts because the top brake bolt is difficult to reach with a socket when the strut bolt isn't removed. 


Step Six:

Pop the ball joint. Remove the pin and 19mm castle nut. I purchased a ball joint separator here. It's INCREDIBLE, beastly, and removes separation anxiety that normally accompanies such a task (remember the forks?). Notice that I don't remove the rotor or rotor shield as in the tutorial. Take caution here, as the ABS sensor (I believe) is wired into the knuckle assembly, and could get damaged if you're not careful with handling the now-separated assembly. With reassembly, I used my jack to put upward pressure on the lower control arm, otherwise the ball joint may just spin in place when you reinstall the castle nut. 


Step Seven:

Halfshaft removal. Here you have options. Take this for what it's worth, but I found a workaround that made life really simple. It the tutorial, you remove the airbox and other stuff to reach the attachment pins. The drive-side pin can be easily reached from underneath. The non-drive not so much. 

Here's my alternative. Remove the wheel end of the halfshaft from the hub, then give a slight tug on the entire halfshaft, removing the shaft and transmission stub shaft all at once. You can now remove the pin and reinsert the new pin on your new halfshaft all from the comfort of your workbench. The trick is on reinstallation. Position the new halfshaft into the transmission. Slowly rotate the halfshaft until the splines engage and slide in. The splines don't need to be at any specific rotation for reengagement. They will only slide in about 1". To finish the reinstall into the transmission, align the halfshaft as straight as you can, compress the halfshaft, and tap the end of the shaft with a mallet. Not much is needed to pop the stub shaft back into place inside the transmission. Install the wheel end of the halfshaft and follow the previous steps in reverse. With the proper tools, this will take you about 30 minutes per axle.

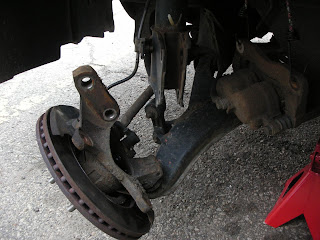
Old shaft out. I placed the ball joint back into its place to hold the assembly still and to not damage the ABS sensor. 
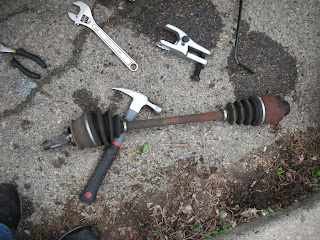
Old, dead, knocking halfshaft. 
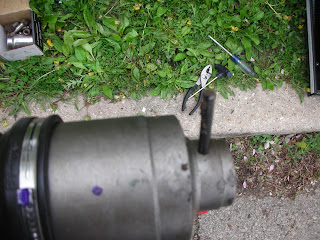
Alignment pin. My thumb and forefinger.
Another alternative is to get the new pin started and install as instructed in the tutorial. This saves you from holding the pin in place at an awkward angle to get it started.
Everything went really smooth until I had an issue removing one of the pins. Use a proper punch. Or have a loaded pistol ready. 

This is clearly today's reason for Why I Ride a bike: car repairs are torture. 

Friday, May 13, 2011

White Industries Wheel Project

My next project involves this:


I had some rim issues (cracked eyelets), and needed to replace the rim, so why not build something new??

I'll keep you posted.

And the family and I are moving to Minnesota in a week.

Sunday, May 1, 2011

Dromarti -- Art For Your Feet

In mid 2009, I stumbled across Dromarti, a distributor out of the UK of finely-crafted cycling goodness. Around this time, I was retracting from the clipless pedal phenomenon, and going old school (for road cycling, as opposed to mountain cycling where I will ABSOLUTELY still use clipless). However, I struggled to find a suitable shoe--one that had style AND function. I could find each attribute separately, but for some reason the marriage of the two eluded me. This is where Dromarti came in.

The Dromarti

Although hand-crafted Italian leather cycling shoes aren't cheap, who cares? People spend more on Dr. Pepper or Starbucks in a year, yet complain about the price of such things as these shoes. Make sure to supersize your next drive-thru order.

So, I convinced myself to place an order. Unfortunately, I was a very early adopter, and suffered a 9-month stockout (May '09 - Feb '10). By the time I received confirmation that the shoe was ready, I was fed up or busy with life or something silly, so the order never materialized.

Around this past Holiday season, I again started my search for dual-attributed shoes. The closest to Dromarti that I found was QuocPham. There is a lot about this shoe that I respect. However, like a childhood sweetheart, my thoughts turned to the Dromarti Storica "Classic."

Quoc Pham Fixed, in Tan


Now that I moved halfway across the country and am immersed in a full-time MBA program, I figured it's the perfect time to invest in this footwear art. So I placed the order. No stockouts this time, folks. In fact, they arrived within a week. From the UK. Wow. I just so happened to be riding the next day. Fantastic.

I rode this:

40-ish mile figure 8 around the lakes.

My feet were so pleased. Here are some pics of the shoes and their fine craftsmanship (not properly showcased on Dromarti's website, IMHO).


You can see where my pedals contact the shoe. Perfectly designed. Notice the stitching and nails for the heel and other sole attachments.


The tongue is nicely padded, and the whole interior is lined with leather.

Dromarti doesn't quite show off the touch of heel enough. It's nailed on to the leather sole. 

They are more comfortable than they look.

So, eliminate Starbucks or Dr. Pepper from your daily life and invest in a pair of awesomeness. Your feet and psyche will thank you for it.